
Back in June I entered a few skirts in the Skirt week competition on Crafterhours. It was a bittersweet moment when I saw this skirt of mine made it to the top 8 in the children's category. Top 8 children's skirts There were some really great skirts entered and I feel truly honored to have my skirt chosen from among them. It was a little bittersweet because this skirt was the last thing I made on my old sewing machine before it died. Tears were shed when that happened. There is something about the power fluctuation here that my machine could not handle and it burned out. At least that is what I figure happened because it had happened once before too. I have a new one now (THANK YOU HONEY!) that I am slowly learning to love but I do miss that Singer. It was lovely while it lasted.
A few ladies asked me if I had a tutorial for this skirt, so here it is! I now have a tutorial and a blog to share it on! I do hope it makes sense and that you are not put off by the silly amateur drawings.. I'm still learning. Perhaps next time I'll take pictures as I am making something rather than only after.
~~~~~~~~~~~~~~~~

Direction given are for about
a size 2T but it’s so simple you could easily adjust it up or down.
- Final skirt measurements (flat) -
length - 9 inches (including lace edge)
waist - 20 inches.
length - 9 inches (including lace edge)
waist - 20 inches.

Supplies:
White cotton. (1/2 yard/10 inches)
I used a nice med. weight cotton
to give a little extra volume.
Swiss dot or voile, lawn
Swiss dot or voile, lawn
or even just quilter’s cotton
in red or whatever strikes your fancy.
(I used a lovely Swiss dot, hence the name)
(3/4 yard/ 20 inches)
Eyelet lace. or other cute lace.
Eyelet lace. or other cute lace.
(2 1/4 yards or more depending on how
many rounds you want. I did 2 plus a little
strip in the back with about 2 1/2 yards.)
1/4 inch satin ribbon in white
1/4 inch satin ribbon in white
(or coordinating color) 1 yard
1” satin ribbon (1 maybe 1 1/2 yards)
1” elastic. (I used about 21 inches -
1” satin ribbon (1 maybe 1 1/2 yards)
1” elastic. (I used about 21 inches -
adjust for you child. )
Sewing stuff
This is a VERY simple skirt. It’s constructed as essentially 2 tubes.

The white cotton is cut into a long strip about 40 inches wide and 10 inches long (I am using a 1/2 inch seam allowance here and giving an inch for the hemming at the bottom + my lace is about an inch wide.) If you want a longer skirt add an inch or 2.
Sew the white strip into a tube. I used a french seam (but any old seam style will work just fine) [French seam = With wrong sides together stitch close to the edge, turn right sides together stitch again. ]

The red dotted fabric is 40 inches wide and 20 inches long. (Again if you are making the skirt longer or if you want the red to cover more of the white layer, add a few inches to the length.)
Fold in half lengthwise with RIGHT sides together.

Sew as shown with rounded corners. (Use a plate to mark the curve if you do not feel confident free handing it.)
Trim off and clip corners, turn right side out.

With the wrong side of the white tube facing out,
wrap the red around overlapping slightly at the top.
Pin in place. Stitch around the top.
Turn.
Top stitch the waist band being care to keep the slight overlap and keeping it about 1 1/4” wide to accommodate the elastic.
Almost done. Now we need to hem up the bottom of the white layer. Fold under 1/2 inch. press (or not) fold again and stitch.
Then simply sew on the rows of lace starting with the bottom one. You could do as many rows as you have lace to do if you wanted to.. I did 2 full rows and had a tiny bit of lace left so I did a little 3rd row in the back where the red top section opens up a little.
Making the bows! Make 4 (or 5) small bows from the 1/4 inch ribbon. I recommend heat sealing them to prevent fraying, or dabbing a little fray check. Make the large bow for in the back. (I attached that bow at the end with a needle and thread but you could also use a longer ribbon and run in through the waist band with the elastic.)
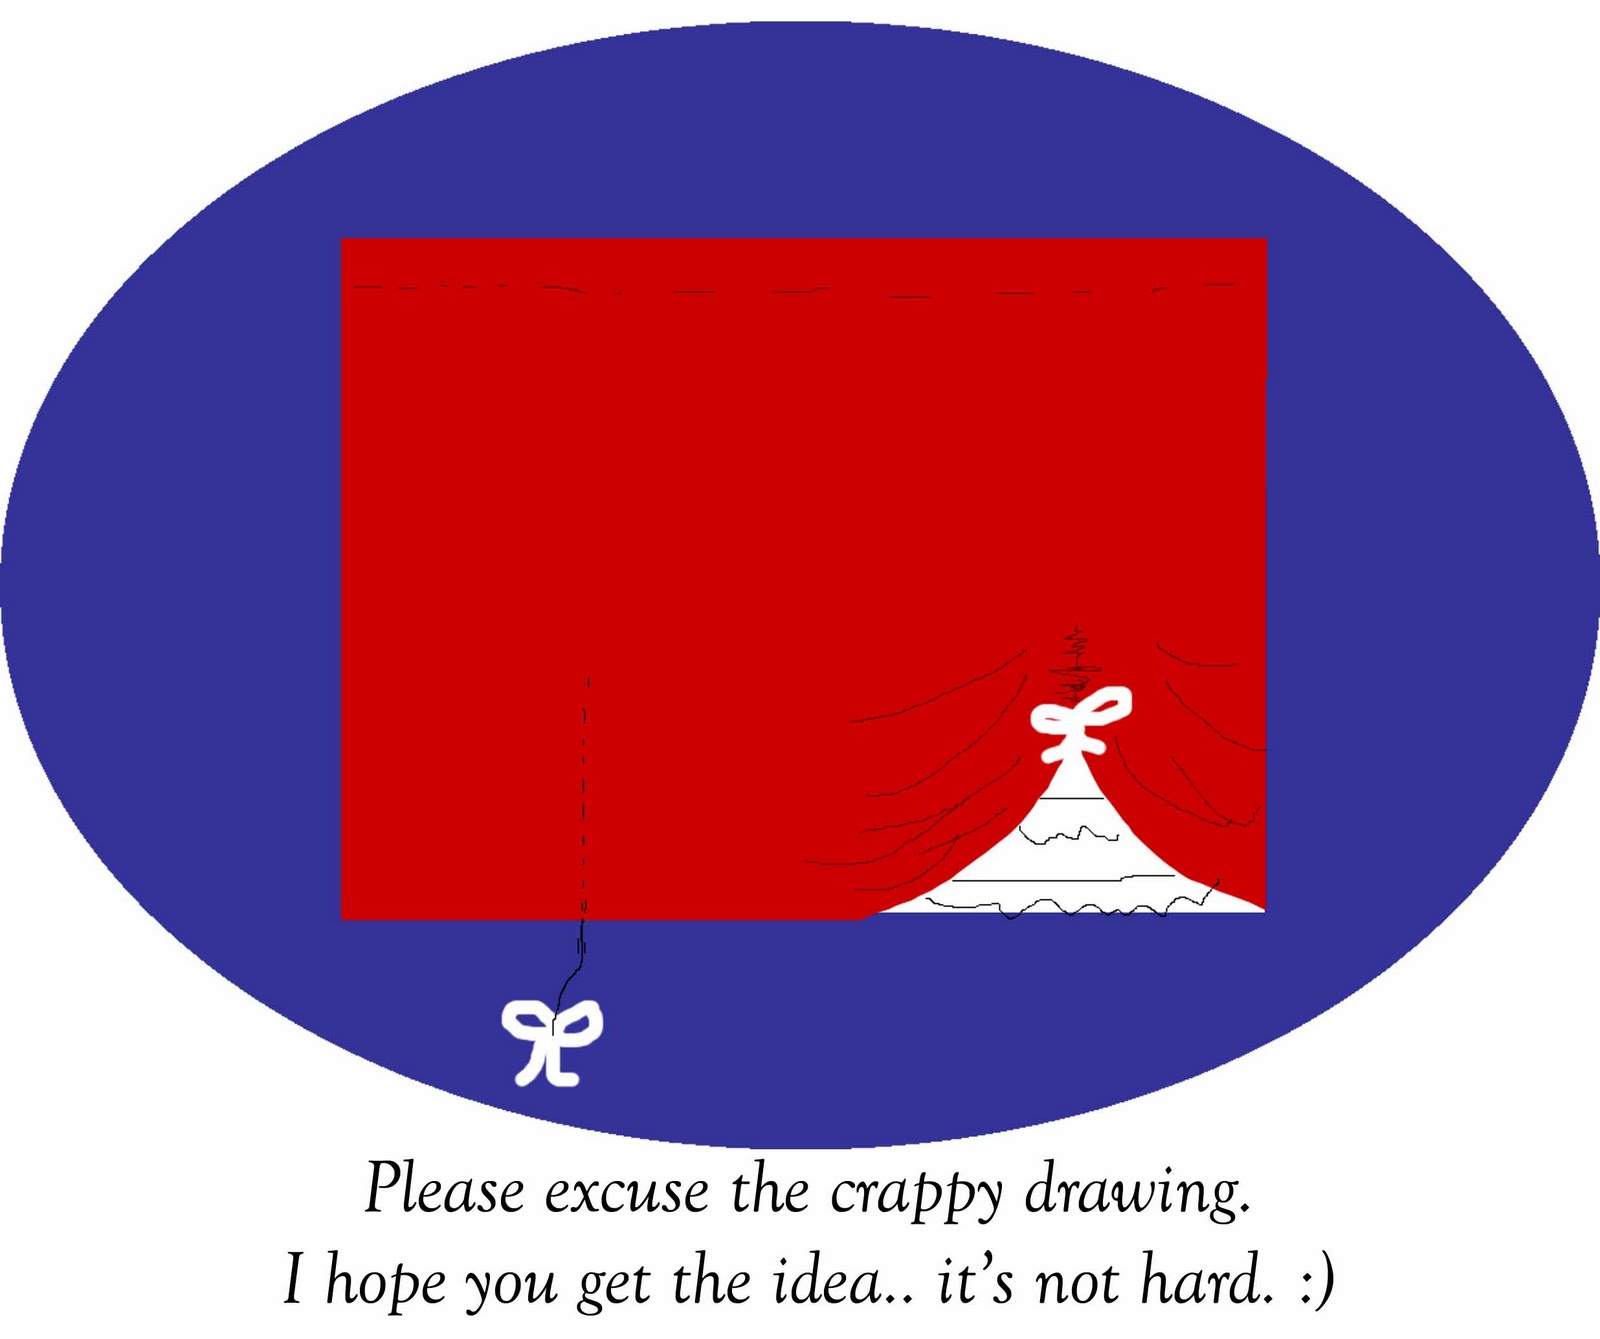
Thread a needle and sew
though the back of a small bow.
Decide where you want the scallops
Decide where you want the scallops
to be and make short running stitches
gathering your red fabric till it’s nicely
above your last row of lace making
an uber cute scallop.
Repeat for the remaining small bows.
Now thread the elastic through the waist,
adjust for child, sew and pull though to ‘hide’.
Attached the big bow in the back
and you’re done!
So simple but cute!

 I really hope that all made sense! If you do make a skirt from this tutorial, I'd love to see it!
u r TRULY A WONDERFUL,awesome, CAPABLE HUMAN BEING WOW!
ReplyDeleteu daughter is very lucky
-asha